| 일 | 월 | 화 | 수 | 목 | 금 | 토 |
|---|---|---|---|---|---|---|
| 1 | 2 | 3 | ||||
| 4 | 5 | 6 | 7 | 8 | 9 | 10 |
| 11 | 12 | 13 | 14 | 15 | 16 | 17 |
| 18 | 19 | 20 | 21 | 22 | 23 | 24 |
| 25 | 26 | 27 | 28 | 29 | 30 | 31 |
- sw
- RapidCheck
- 고급C
- 라즈베리파이
- FLASK
- detection
- php
- keras
- Object Detection
- 머신러닝
- Raspberry
- 정리
- 가상환경
- 안드로이드
- tensorflow
- MySQL
- 영상분석
- IMAGE
- Python
- Deep Learning
- 서버
- 디버그모드
- C언어
- tracking
- Machine Learning
- Android
- 지능형
- 데이터
- Linux
- Video
- Today
- Total
건프의 소소한 개발이야기
[안드로이드] Android Volley 사용 Network 통신하는 법 본문
안녕하세요, 건프입니다.
이번에는 고급스런 안드로이드 어플리케이션 개발할 때, 한번쯤은 생각하게 되는 데이터 통신(Data Network) 하는 방법에 대해 알아봅니다.
2013년 구글 I/O 전에는 안드로이드에서 네트워크 통신을 하기 위해서는 Asyntask 클래스를 이용해서 직접 운용할 수 밖에 없었습니다.
하지만 이방법에는 예외처리하기가 까다롭기 때문에, 네트워크가 들어가는 순간 에너지가 많이 들어가게 되었죠.
이에 구글은 Android Volley 라이브러리를 13년도에 발표하면서 그 편의성을 높혀주었습니다.
그럼 바로 프로젝트에 적용시키는 모습을 보여드립니다.
1. 우선 volley 라이브러리 파일을 import 해야합니다.
그 방법에는 여러가지 방법이 있지만, 우리는 maven 방식을 이용합니다.(이 편이 훨씬 깔끔하고 편리합니다.)

위 사진에서 가장 아래에 있는 링크를 여러분들 프로젝트의 app 폴더 아래의 build.gradle 에 추가합니다.
gradle sync 를 돌려줍니다.
2. 제대로 import 되었는지 확인합니다.

이렇게 코드를 넣었을 때, 다음과 같이 import 할 수 있도록 도움말이 뜬다면, 제대로 임포트 된것입니다.
3. Volley 폴더아래, 클래스를 하나 정의합니다.
/**
 * Created by myZZUNG on 2016. 4. 23..
 */
public class MyVolley {
    private static MyVolley one;
    private RequestQueue requestQueue;
    private ImageLoader imageLoader;
    private final LruCache<String,Bitmap> cache = new LruCache<String,Bitmap>(20);

    private MyVolley(Context context) {
        requestQueue = Volley.newRequestQueue(context);
        imageLoader = new ImageLoader(requestQueue,new ImageLoader.ImageCache(){

            @Override
            public Bitmap getBitmap(String url) {
                return cache.get(url);
            }

            @Override
            public void putBitmap(String url, Bitmap bitmap) {
                cache.put(url,bitmap);
            }
        });

    }

    public static MyVolley getInstance(Context context) {
        if (one == null) {
            one = new MyVolley(context);
        }
        return one;
    }

    public RequestQueue getRequestQueue() {
        return requestQueue;
    }

    public ImageLoader getImageLoader() {
        return imageLoader;
    }
}
위는 MyVolley 클래스를 싱글톤 기법(Singleton tech) 로 정의한 겁니다.
(싱글톤이 무엇인지 모르는 분은 검색해보세요)
4. 그리고 네트워크를 확인할 수 있는 Fragment 를 준비합니다.
public class HomeFragment extends Fragment {

    TextView home_text = null;

    private final String server_url = "-------------------/test_dir/coil_test.php";


    public HomeFragment() {
        // Required empty public constructor
    }


    @Override
    public View onCreateView(LayoutInflater inflater, ViewGroup container,
                             Bundle savedInstanceState) {
        // Inflate the layout for this fragment
        final RequestQueue queue = MyVolley.getInstance(getActivity()).getRequestQueue();

        ViewGroup rootView = (ViewGroup)inflater.inflate(R.layout.fragment_home, container, false);

        home_text = (TextView) rootView.findViewById(R.id.home_text);
        Button home_btn = (Button) rootView.findViewById(R.id.home_button);
        home_btn.setOnClickListener(new View.OnClickListener() {
            @Override
            public void onClick(View v) {
                JsonObjectRequest myReq = new JsonObjectRequest(Request.Method.POST,
                        server_url,
                        new JSONObject(),
                        networkSuccessListener(),
                        networkErrorListener());

                queue.add(myReq);

            }
        });


        return rootView;
    }
    private Response.Listener<JSONObject> networkSuccessListener() {
        return new Response.Listener<JSONObject>() {
            @Override
            public void onResponse(JSONObject response) {
                String from_server = null;
                try {
                    from_server = response.getString("test");
                } catch (JSONException e) {
                    e.printStackTrace();
                }
                home_text.setText(from_server);

            }
        };
    }
    private Response.ErrorListener networkErrorListener() {
        return new Response.ErrorListener() {
            @Override
            public void onErrorResponse(VolleyError error) {
                Toast.makeText(getActivity(), "Network Error", Toast.LENGTH_SHORT).show();
            }
        };
    }

}
기본 뼈대는 위와 같습니다.
RequestQueue queue = MyVolley.getInstance(getActivity()).getRequestQueue();
이것으로 Request를 날릴 RequestQueue 인스턴스를 MyVolley 부터 가져옵니다.
JsonObjectRequest myReq = new JsonObjectRequest(Request.Method.POST,
                        server_url,
                        new JSONObject(),
                        networkSuccessListener(),
                        networkErrorListener());

                queue.add(myReq);
이건 Requset 를 날릴 방식이 Json 방식으로 "주고 받을 것이고"
방법은 POST방식,
server_url 에 적은 곳으로 보낼 것이며, (개인적인 서버의 url 이 들어나는것이 문제가 될까바 중요한 부분은 가렸습니다...:( )
비어있는 JSONObject를 보내고
통신이 성공했을 시, networkSuccessListener를 부르고
통신이 실패했을 때, networkErrorListener 를 불러달라는 의미고
queue 에 add 하면서 통신을 시작합니다.
home_fragment.xml 은 다음과 같습니다.(특별할 것은 없어요)
<LinearLayout xmlns:android="http://schemas.android.com/apk/res/android"
    xmlns:tools="http://schemas.android.com/tools"
    android:layout_width="match_parent"
    android:layout_height="match_parent"
    android:orientation="vertical"
    tools:context="com.brianandroid.myzzung.coli.ui.HomeFragment">

    <!-- TODO: Update blank fragment layout -->


    <TextView
        android:id="@+id/home_text"
        android:layout_width="match_parent"
        android:layout_height="wrap_content"
        android:text="home fragment" />

    <Button
        android:id="@+id/home_button"
        android:layout_width="match_parent"
        android:layout_height="wrap_content"
        android:text="통신시작하기"
        android:visibility="visible" />

</LinearLayout>
6. server_url 에 위치하고 있는 서버파일을 다음과 같습니다.
<?php
$value = json_decode(file_get_contents('php://input'), true);
$to_client['test'] = "hello coil";
echo json_encode($to_client);
?>
php 파일인데, json 데이터를 $value 변수에 받아들이고
test 란 key에 hello coil 라는 value를 저장해서
json 형태로 encode 해서 뿌립니다.
위를 브라우저에서 뽑아보면 다음과 같아요.

간단한 Json 데이터를 리턴하는 형식입니다.
그리고 이제 빼먹으면 안되는작업이 있습니다.
7. Permission 은 설정해줍니다.
<manifest xmlns:android="http://schemas.android.com/apk/res/android"
    package="com.brianandroid.myzzung.coli">

    <uses-permission android:name="android.permission.INTERNET"/>
    <uses-permission android:name="android.permission.ACCESS_NETWORK_STATE"/>

    <application
        android:allowBackup="true"
        android:icon="@mipmap/ic_launcher"
인터넷만 허용해주시면 됩니다.
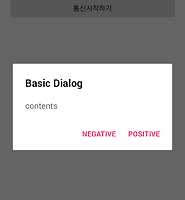
8. 이렇게하고 실행해보면

버튼을 누르면

성공했군요 >_<
이제 여러분들도 안드로이드로 네트워크통신을 이렇게 편리하게 진행하실 수 있습니다.
작은 도움이라도 되었길 바랍니다
Happy Coding :)
고맙습니다
' 개발 이야기 > 안드로이드 이야기' 카테고리의 다른 글
| [안드로이드] Google Cloud Message(GCM) 적용시키기 - (1) (0) | 2016.05.07 |
|---|---|
| [안드로이드] Material Dialog 관련 라이브러리 사용법 (1) (0) | 2016.05.01 |
| [안드로이드] Android NavigationView - Fragment 화면전환까지 (11) | 2016.04.19 |
| [안드로이드] Android NavigationView 다뤄보기 (1) | 2016.04.18 |
| [안드로이드] Android Notification 구현하기 (2) | 2016.04.17 |